How to Install PS2 BIOS: Complete Setup Guide for Every Device
You downloaded a PS2 emulator. You found your game file. You clicked play. And then you saw it:
“No BIOS file found.”
Nothing is broken. Your emulator works fine. You are just missing one small file — and more often than not, the file is already on your computer. It is simply sitting in the wrong folder.
This guide fixes that. It covers every emulator, every device, and every exact folder path. No guessing. No “just put it in the BIOS folder” without telling you where that folder actually is.
Time needed: 5 minutes Difficulty: Easy — no technical skills required
Haven’t got the file yet? Grab it from our PS2 BIOS download page first, then come back here.
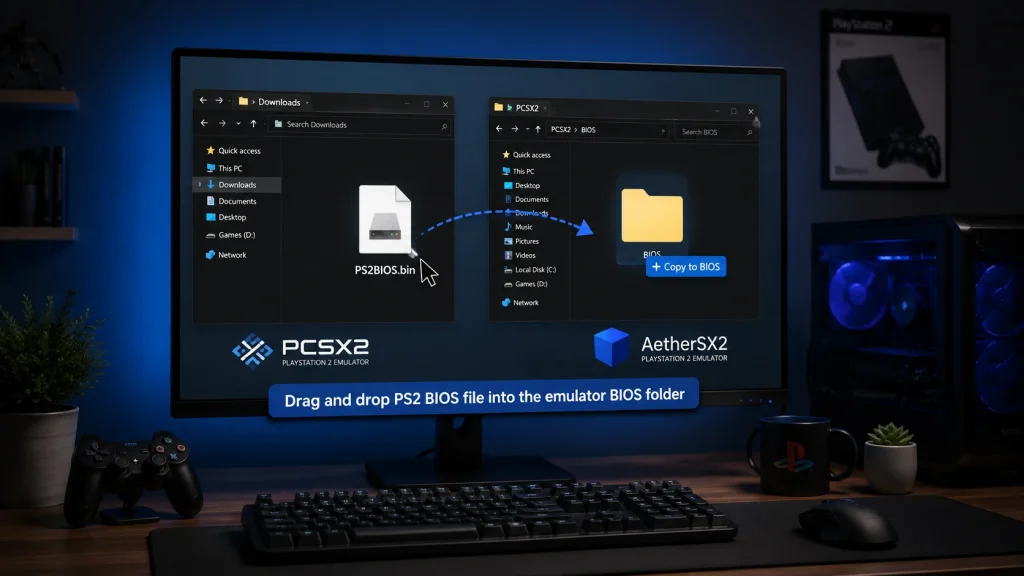
Quick Answer: Install PS2 BIOS in 5 Steps
If you are in a hurry, here is the short version:
- Download the BIOS file that matches your game’s region.
- Extract the ZIP file completely. You need the raw .bin file.
- Copy the .bin file into your emulator’s BIOS folder.
- Open your emulator, go to BIOS settings, and point it to that folder.
- Select the BIOS version from the list and save.
That is it. The rest of this guide explains each step for your specific device, plus what to do when something does not work.
Before You Start: What You Need
| What you need | Details |
|---|---|
| PS2 BIOS file | A .bin file, around 4 MB per region |
| Extraction tool | 7-Zip (Windows), The Unarchiver (Mac), ZArchiver (Android), built-in (Linux) |
| An emulator | PCSX2, AetherSX2, NetherSX2, RetroArch or EmuDeck |
| Free storage | 20 MB for the BIOS, plus space for your games |
The number one mistake people make: leaving the BIOS inside the ZIP file.
Every emulator reads the raw .bin file directly. A zipped BIOS will never be detected, no matter which folder you drop it in. Extract it first — always.
Step 1: Get the Right BIOS File
Your BIOS should match the region of the games you want to play. Here is the quick version:
| Your games | BIOS to use | SCPH model |
|---|---|---|
| USA / Canada | NTSC-U | SCPH-39001 or SCPH-70012 |
| Europe / UK / Australia | PAL | SCPH-50003 or SCPH-75004 |
| Japan | NTSC-J | SCPH-10000 or SCPH-18000 |
| China | NTSC-C | SCPH-70000 |
| Not sure / mixed library | Full pack | All of the above |
Our advice: download the full pack. It includes every region, takes up less than 20 MB, and your emulator will let you switch between them in two clicks. There is no downside.
👉 Download PS2 BIOS files (all regions)
Want a deeper breakdown of each version? Read our guide on which PS2 BIOS to use.
Step 2: Extract the ZIP File Properly
This step causes more failed installs than anything else. Here is how to do it on each system:
Windows
- Right-click the ZIP file
- Choose Extract All
- Pick a folder you will remember (Documents is a good choice)
- Click Extract
macOS
- Double-click the ZIP file
- macOS extracts it into the same folder automatically
- If it fails, install The Unarchiver from the App Store
Linux
- Right-click and choose Extract Here
- Or run in terminal: unzip ps2-bios.zip -d ~/ps2-bios/
Android
- Install ZArchiver or use Files by Google
- Long-press the ZIP file
- Tap Extract to and choose a folder
- Name it something clear like PS2 BIOS
⚠️ Do not open the ZIP and drag files out of the preview window. On Windows this sometimes copies a shortcut instead of the real file. Always use “Extract All”.
What’s Inside the BIOS Pack? (File Types Explained)
When you extract the pack, you will see several files with strange extensions. Most guides ignore these. Here is what each one actually does:
| File | What it is | Do you need it? |
|---|---|---|
| .bin | The main BIOS ROM. This is the core file. | Yes — essential |
| .nvm | Non-volatile memory. Stores region, language and console settings. | Recommended |
| .mec | MechaCon firmware. Controls the disc drive on a real console. | Recommended |
| .erom | DVD player ROM. Used for DVD video playback. | Optional |
| .rom1 | DVD player firmware. | Optional |
| .rom2 | Chinese language ROM. Only on Chinese consoles. | Optional |
Simple rule: keep all the files together in one folder. The .bin is the only one your emulator truly needs, but the extra files sit quietly alongside it and stop a few rare games from complaining.
Do not rename the files. The companion files must share the same base name as the .bin file. For example, scph39001.bin pairs with scph39001.nvm. Rename one and the pairing breaks.
Step 3: Check Your BIOS File Is Genuine
Most sites skip this step. It takes 30 seconds and it saves you hours of confusing errors later.
A real PS2 BIOS file has a fixed size and a fixed digital fingerprint. If your file has been corrupted mid-download or tampered with, it will fail in ways that look like emulator bugs.
Quick size check: a single-region BIOS .bin should be around 4 MB (4,194,304 bytes). If yours is 1 KB or 200 MB, the download failed. Get it again.
Proper fingerprint check (MD5 / SHA-1):
| System | Command |
|---|---|
| Windows | certutil -hashfile scph39001.bin MD5 (in Command Prompt) |
| macOS | md5 scph39001.bin (in Terminal) |
| Linux | md5sum scph39001.bin (in Terminal) |
| Android | Use the “Hash Droid” app or check the file size in ZArchiver |
Compare the result against the checksum list on the official PCSX2 wiki or the Redump database. If it matches a known good dump, your file is clean.
Easiest check of all: once installed, PCSX2 shows the BIOS name and version number in its settings (for example, SCPH-39001 v1.60). If PCSX2 can read and name your BIOS, the file is valid.
How to Install PS2 BIOS on PCSX2 (Windows)
PCSX2 is the main PS2 emulator for PC. Get it from the official site, pcsx2.net, before you start.
There are two ways to add your BIOS. Use Method 1 if you are setting up for the first time. Use Method 2 anytime after that.
Method 1: During First Launch (Setup Wizard)
- Open PCSX2 for the first time — the setup wizard starts automatically
- Choose your language and click Next
- You will land on the BIOS Directory screen
- Click Browse
- Select the folder that holds your extracted .bin file
- Click OK — PCSX2 scans the folder instantly
- All detected BIOS versions appear in a list
- Click the version you want (SCPH-39001 is the safest default)
- Click Next and finish the wizard
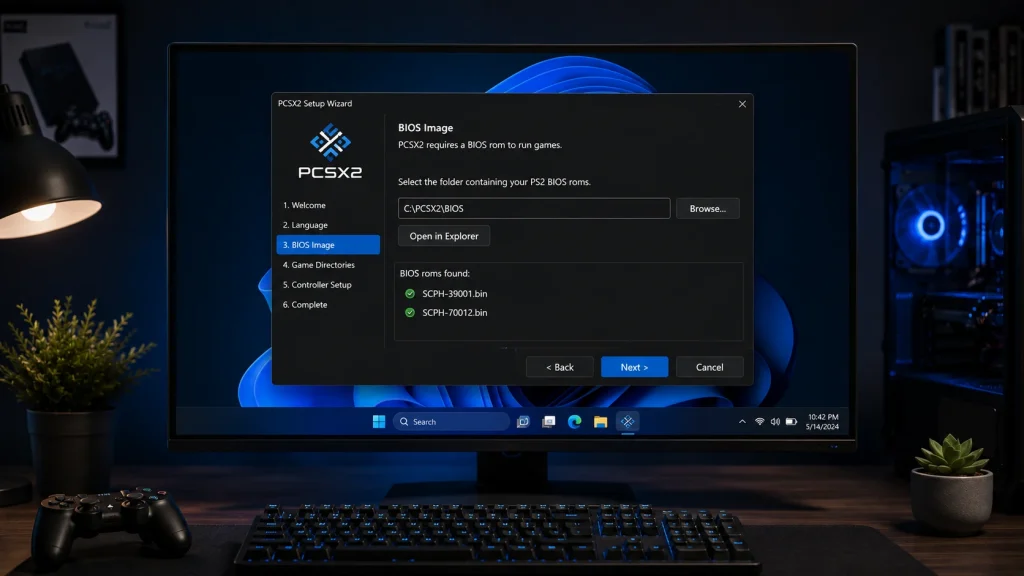
Method 2: Through Settings (Anytime)
- Open PCSX2
- Click Settings in the top menu
- Click BIOS in the left panel
- Click Browse next to the BIOS directory box
- Choose your BIOS folder and confirm
- Your BIOS versions appear in the list below
- Click one to highlight it
- Click Apply, then Close
Where Is the PCSX2 BIOS Folder on Windows?
PCSX2 has two install modes, and the folder is different for each:
| Install mode | BIOS folder path |
|---|---|
| Installed mode (default) | C:\Users\[YourName]\Documents\PCSX2\bios\ |
| Portable mode | [PCSX2 folder]\bios\ |
You are in portable mode if there is a file called portable.txt sitting next to pcsx2-qt.exe.
Good news: you do not have to use the default folder at all. PCSX2 will read from any folder you point it to. What matters is that the path in Settings > BIOS actually contains your .bin file.
Still Using PCSX2 1.6 (the old version)?
PCSX2 1.6 and earlier used a completely different interface. If your emulator window looks grey and boxy rather than modern, you are on the legacy build.
- The menu is Config > Plugin/BIOS Selector instead of Settings > BIOS
- The default folder is [PCSX2 folder]\bios\
- Click Refresh list after adding a file, or it will not appear
Our advice: upgrade. PCSX2 2.0 and newer are faster, support more games, and handle BIOS files far better. Your saves and memory cards carry over.
How to Install PS2 BIOS on Mac (macOS)
The steps inside PCSX2 are identical to Windows. Only the folder path changes.
- Download the macOS build from pcsx2.net
- Move PCSX2 to your Applications folder
- Open it and follow the setup wizard
- On the BIOS screen, click Browse
- Point it to your extracted BIOS folder
Default BIOS path on macOS: ~/Library/Application Support/PCSX2/bios/
The Library folder is hidden by default. To open it:
- In Finder, press Cmd + Shift + G
- Paste the path above
- Press Enter
Apple Silicon note: PCSX2 runs on M1, M2, M3 and M4 Macs. Make sure you download the Apple Silicon build rather than the Intel one for the best speed.
How to Install PS2 BIOS on Linux
Linux has three common PCSX2 install types, and each stores the BIOS somewhere different. This is where most people get stuck.
| Install type | BIOS folder path |
|---|---|
| AppImage / native | ~/.config/PCSX2/bios/ |
| Flatpak | ~/.var/app/net.pcsx2.PCSX2/config/PCSX2/bios/ |
| Snap | ~/snap/pcsx2/current/.config/PCSX2/bios/ |
Can’t see the folder? Those paths start with a dot, which means they are hidden. Press Ctrl + H in your file manager to show hidden files.
Terminal method (fastest):
mkdir -p ~/.config/PCSX2/bios
cp ~/Downloads/ps2-bios/*.bin ~/.config/PCSX2/bios/
Then open PCSX2, go to Settings > BIOS, and your file will already be listed.
How to Install PS2 BIOS on Android (AetherSX2)
AetherSX2 is the best-known PS2 emulator for Android. It is no longer on the Google Play Store — the developer stopped work on it after receiving abuse online. The app still works perfectly, but you now install it as an APK from a trusted archive such as Archive.org.
First-Time Setup
- Open AetherSX2 — the welcome screen appears
- Tap Next
- Adjust the performance settings for your phone, tap Next
- You reach the BIOS screen
- Tap the + icon
- Your file manager opens
- Navigate to your extracted BIOS folder
- Select the .bin file
- It appears in the list with its region shown (e.g. USA — NTSC-U)
- Tap Next to finish
Adding a BIOS Later
- Open AetherSX2
- Tap Settings
- Scroll to Core Settings and tap BIOS
- Tap Browse
- Choose your .bin file and confirm
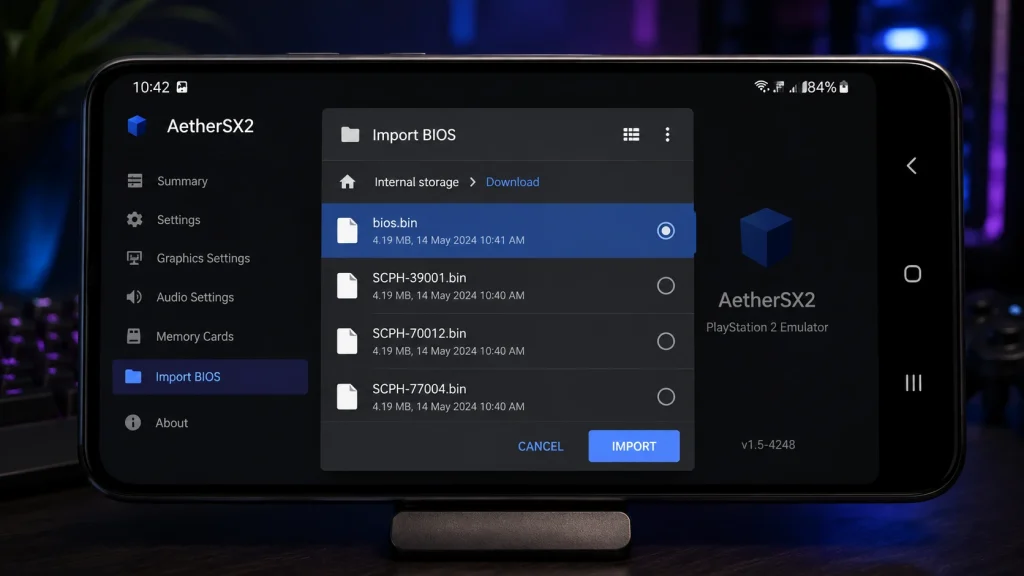
Android Tips That Save Time
- Save your BIOS in Internal Storage, not on an SD card. Android’s permission system often blocks emulators from reading SD card folders.
- Create a folder called PS2 BIOS in your internal storage and keep everything there.
- If the file picker shows nothing, grant AetherSX2 All Files Access in Android Settings > Apps > AetherSX2 > Permissions.
- Best BIOS for Android: SCPH-39001 (USA v1.60). It gives the widest game support with the least fuss.
How to Install PS2 BIOS on NetherSX2
NetherSX2 is a community-modified build of AetherSX2. It removes the ads, unlocks the paid features, and adds a few performance tweaks. Many Android users prefer it.
Good news: the BIOS process is exactly the same as AetherSX2.
- Install the NetherSX2 APK
- Open it and run through the setup wizard
- On the BIOS screen, tap +
- Select your extracted .bin file
- Tap Next
If you already used AetherSX2, you can point NetherSX2 at the same BIOS folder. You do not need a second copy of the file.
One thing to know: because NetherSX2 is an unofficial build, it is not on any app store. Only install it from well-known community sources, and scan the APK before you install.
Other Android Emulators: DamonPS2 and ArmSX2
Two more Android options come up regularly. Both use the same .bin BIOS file — only the menus differ.
DamonPS2
- Install DamonPS2 from the Play Store
- Open the app and tap the folder icon
- Navigate to your extracted BIOS folder and select it
- The app scans and loads the BIOS automatically
Be aware: DamonPS2 is heavily ad-supported, locks key features behind a paid version, and updates slowly. Compatibility is noticeably lower than AetherSX2. Use it only if AetherSX2 will not run on your device.
ArmSX2
- A newer fork built on the PCSX2 codebase for ARM64 devices
- Setup follows the same pattern: open the app, tap the BIOS option, browse to your .bin file
- Still young compared to AetherSX2, so expect rougher edges on some games
Bottom line for Android: AetherSX2 or NetherSX2 remain the strongest choices in 2026. The others are backups, not upgrades.
How to Install PS2 BIOS on RetroArch (PC and Android)
RetroArch uses a stricter folder structure than standalone emulators. Get one letter wrong and it silently fails.
Step 1: Install RetroArch
- PC: download from retroarch.com, or install it from Steam
- Android: install it from the Google Play Store
- Open it once, then close it fully — this creates the folder structure
Step 2: Find Your System Folder
Open RetroArch and go to Settings > Directory > System / BIOS. Note down the path shown.
Step 3: Build the Folder Path
Inside the system folder, create this structure:
system/pcsx2/bios/
Put your extracted .bin file inside the bios folder.
⚠️ Both folder names must be lowercase. pcsx2 works. PCSX2 does not. This single detail breaks more RetroArch setups than anything else.
Step 4: Download the PS2 Core
- Go to Main Menu > Load Core > Download a Core
- Turn on Show Experimental Cores in Settings if you cannot see it
- Find and download Sony — PlayStation 2 (LRPS2)
Step 5: Load a Game
Go to Main Menu > Load Content, find your game file, and pick the LRPS2 core when asked.
Important hardware note: the LRPS2 core needs x86_64 hardware. It does not run natively on ARM chips. That means it will not work on most Android phones, on ARM-based Windows laptops, or natively on Apple Silicon Macs. On Android, use AetherSX2 or NetherSX2 instead.
How to Install PS2 BIOS on Steam Deck (EmuDeck)
EmuDeck sets up every emulator on the Steam Deck automatically. You only need to supply the BIOS.
- Hold the power button and choose Switch to Desktop
- Open a browser, go to emudeck.com, download and run the installer
- EmuDeck creates all folders for you
- Open the Dolphin file manager
- Navigate to /home/deck/Emulation/bios/
- Copy your extracted .bin file directly into that folder
- Open EmuDeck and go to Tools and Stuff > BIOS Checker > Check Again
- You should see “PlayStation 2 BIOS detected”
- Switch back to Gaming Mode
🚫 Critical rule: put the file directly inside bios. Do not create a PS2 or pcsx2 subfolder inside it. PCSX2 will not look inside subfolders, and this is the number one reason Deck users see “BIOS missing”.
Using an SD card? If you pointed EmuDeck at your SD card during setup, the path becomes [SD card]/Emulation/bios/. The no-subfolders rule still applies.
Can’t see the folder? In Dolphin, click the hamburger menu (top right) and turn on Show Hidden Files.
How to Install PS2 BIOS on EmuDeck for Windows
EmuDeck also runs on Windows. The layout mirrors the Steam Deck version.
- Download EmuDeck from emudeck.com and run the installer
- Choose your storage drive during setup
- Your BIOS folder will be at [Your Drive]\Emulation\bios\
- Drop the extracted .bin file directly into that folder — no subfolders
- Open PCSX2 through EmuDeck
- Go to Settings > BIOS — your file should appear
- If it does not, click Browse and select the Emulation\bios folder manually
How to Install PS2 BIOS on iPhone and iPad
Let’s be straight with you here, because most sites are not.
PS2 emulation on iOS is very limited right now. The main PS2 core (LRPS2) needs x86 hardware, and iPhones use ARM chips. So the full PCSX2 experience is not available on iOS the way it is on Android.
Here is what actually works today:
Option 1 — Play! emulator
- Available through the App Store or AltStore depending on your region
- Does not need a BIOS file at all — it uses a high-level emulation approach
- Game support is lower than PCSX2, and many titles have graphical glitches
- Good for simple 2D and lighter 3D games
Option 2 — RetroArch with the LRPS2 core
- RetroArch is on the App Store
- The PS2 core is not officially supported on ARM iOS devices
- Even on the latest iPhone Pro models, expect very low frame rates or crashes
Option 3 — Sideloading a PCSX2 fork
- Some community builds exist through AltStore or SideStore
- These change often and are not officially supported
- If you do use one, the BIOS goes into the app’s own documents folder via the Files app
Honest recommendation: if you want proper PS2 emulation on a phone, an Android device with AetherSX2 will give you a far better experience than any iPhone. For iOS, PS1 and PSP emulation are much more realistic targets today.
How to Install PS2 BIOS on Xbox Series X and Series S
Yes, this works. Xbox consoles can run PCSX2 through XBSX2, a port of the emulator installed via Developer Mode.
- Register your Xbox for Developer Mode through your Microsoft account
- Switch the console into Dev Mode
- Sideload the XBSX2 package
- Open Xbox Device Portal in a browser on your PC (the console shows you the address)
- Go to File Explorer in the portal
- Navigate to the XBSX2 app’s LocalState > bios folder
- Upload your extracted .bin file there
- Launch XBSX2 — go to Settings > BIOS and select your file
Note: Dev Mode has an annual fee and it changes how your console behaves. This route suits enthusiasts rather than casual players.
Complete BIOS Folder Path Table
Bookmark this section. It is the fastest way to find where your BIOS belongs.
| Device | Emulator | BIOS folder path |
|---|---|---|
| Windows (installed) | PCSX2 | C:\Users\[Name]\Documents\PCSX2\bios\ |
| Windows (portable) | PCSX2 | [PCSX2 folder]\bios\ |
| Windows | EmuDeck | [Drive]\Emulation\bios\ (no subfolders) |
| Windows | RetroArch | RetroArch\system\pcsx2\bios\ |
| macOS | PCSX2 | ~/Library/Application Support/PCSX2/bios/ |
| Linux (native) | PCSX2 | ~/.config/PCSX2/bios/ |
| Linux (Flatpak) | PCSX2 | ~/.var/app/net.pcsx2.PCSX2/config/PCSX2/bios/ |
| Linux (Snap) | PCSX2 | ~/snap/pcsx2/current/.config/PCSX2/bios/ |
| Steam Deck | EmuDeck | /home/deck/Emulation/bios/ (no subfolders) |
| Steam Deck | RetroArch | ~/.var/app/org.libretro.RetroArch/config/retroarch/system/pcsx2/bios/ |
| Android | AetherSX2 | Any folder — you pick it in the app |
| Android | NetherSX2 | Any folder — you pick it in the app |
| Android | RetroArch | RetroArch/system/pcsx2/bios/ |
| Xbox Series X/S | XBSX2 | App’s LocalState\bios\ folder |
How to Confirm the BIOS Installed Correctly
Do not just assume it worked. Here is how to be sure before you waste time loading a game.
On PCSX2:
- Go to Settings > BIOS
- Your BIOS appears with its full name and version, such as SCPH-39001 v1.60 (07/02/2002) Console
- If PCSX2 can read the version string, the file is valid and detected
On AetherSX2 / NetherSX2:
- Go to Settings > Core Settings > BIOS
- The region label appears next to the file (e.g. USA — NTSC-U)
On EmuDeck:
- Open Tools and Stuff > BIOS Checker
- Look for a green tick next to PlayStation 2
The ultimate test — boot to the PS2 menu:
- In PCSX2, turn off Fast Boot (Settings > BIOS > Options and Patches)
- Start the emulator with no game loaded
- If your BIOS is working, you will see the PlayStation 2 startup animation and the browser menu
If that menu appears, your BIOS is installed perfectly. Any problems after this point are game or settings related, not BIOS related.
How to Find Your Game’s Region
If your BIOS is installed but a game refuses to boot, region mismatch is usually the reason. Every PS2 game has a serial code, and the first four letters tell you the region.
| Serial prefix | Region | BIOS to use |
|---|---|---|
| SLUS / SCUS | USA & Canada | NTSC-U |
| SLES / SCES | Europe, UK, Australia | PAL |
| SLPS / SLPM / SCPS | Japan | NTSC-J |
| SLKA / SCKA | Korea | NTSC-J |
| SLAJ / SCAJ | Asia (general) | NTSC-J or PAL |
| SLPN | China | NTSC-C |
Where to find the serial:
- On a real disc: printed on the disc face and the spine of the case
- In an ISO file: usually in the filename, or shown by PCSX2 in the game list
- In PCSX2: right-click a game > Properties > look at the Serial field
Match the prefix to the right BIOS and the vast majority of boot problems disappear.
Fast Boot vs Full Boot: Which Should You Use?
Once your BIOS works, PCSX2 gives you two ways to start a game.
Fast Boot — skips the PlayStation 2 startup animation and jumps straight into the game.
- Use this for around 90% of games
- Saves 10 to 15 seconds every launch
Full Boot — plays the full PS2 startup sequence, including the memory card browser.
- Use this if a game shows a black screen on Fast Boot
- Use this if you need to open the BIOS menu to change system language or date
- A handful of titles, including some Final Fantasy games, behave better on Full Boot
You can switch anytime under Settings > BIOS > Options and Patches.
How to Change or Remove a BIOS Later
Installed the wrong region? Want to switch? It takes seconds.
To switch versions (PCSX2):
- Go to Settings > BIOS
- Click a different version in the list
- Click Apply
To add more regions:
- Copy the extra .bin files into the same BIOS folder
- Reopen Settings > BIOS — PCSX2 rescans automatically
- All versions now appear in the list
To remove a BIOS completely:
- Delete the .bin file from the folder
- Reopen the BIOS settings so the emulator refreshes its list
You can keep every region installed at once. There is no performance cost, and it means you are ready for any game you come across.
Common Installation Errors and How to Fix Them
“BIOS Not Found” or “No BIOS Selected”
Why it happens: the file is still inside a ZIP, or your emulator is pointing at the wrong folder.
Fix:
- Confirm the file is fully extracted and ends in .bin
- Go to Settings > BIOS > Browse and reselect the folder manually, even if the path already looks right
- Make sure the folder contains the .bin file directly, not a subfolder holding it
“Not a Valid PS2 BIOS”
Why it happens: the file is corrupted, incomplete, or it is actually a PS1 BIOS.
Fix:
- Check the file size — it should be around 4 MB
- Download the file again on a stable connection
- Make sure you did not grab a PS1 BIOS by mistake (those are around 512 KB)
Black Screen After Loading a Game
Why it happens: region mismatch, or a damaged game file.
Fix:
- Check your game’s serial prefix using the table above
- Switch to the matching BIOS region
- Try Full Boot instead of Fast Boot
- Test a different game — if that one loads, the problem is your game file, not your BIOS
BIOS Shows in the List but Games Still Won’t Start
Why it happens: almost always a region mismatch or a bad game dump.
Fix:
- Match the BIOS region to the game serial
- Verify your game file is complete
- Update your emulator to the latest version
EmuDeck Says BIOS Missing
Why it happens: the file is inside a subfolder.
Fix: move the .bin file into the root of the Emulation/bios folder. Nothing should sit between bios and your file.
RetroArch Shows a Black Screen
Why it happens: wrong folder path, or folder names in capitals.
Fix: confirm the path is exactly system/pcsx2/bios/ in lowercase, then restart RetroArch completely.
Android File Picker Shows Nothing
Why it happens: Android’s storage permissions are blocking the emulator.
Fix:
- Go to Settings > Apps > [your emulator] > Permissions
- Grant All Files Access
- Move the BIOS to internal storage rather than an SD card
Your Antivirus Deleted the File
Why it happens: some antivirus tools flag emulator files as suspicious. It is a false positive.
Fix:
- Check your antivirus quarantine folder and restore the file
- Add your BIOS folder to the exclusions list
- Extract the ZIP again
For a deeper walkthrough of every error message, see our guide on fixing PCSX2 BIOS errors.
Get the Best Performance After Setup
Your BIOS is installed. These settings turn a working emulator into a smooth one:
- Use the Vulkan renderer. On PCSX2 and AetherSX2, Vulkan beats OpenGL on most modern hardware. Switch it under Graphics settings.
- Start at 2x internal resolution. 4x looks sharper but needs serious GPU power. Move up only if 2x stays smooth.
- Keep Fast Boot on for daily play. Save Full Boot for the few games that need it.
- Match BIOS region to game region. It takes five seconds and prevents audio speed issues and save problems.
- Close background apps. On both PC and phone, background processes steal the resources your emulator needs.
- Android: enable High Performance mode. Many phones throttle their chips by default. Turn this on for demanding games.
- Keep your emulator updated. PCSX2 ships frequent updates that improve compatibility with no effort on your part.
- Store everything in one place. One folder named “PS2 BIOS” with every region inside. Point your emulator there once and forget about it.
New to PCSX2? Our full PCSX2 setup guide for Windows walks through every setting.
Is Installing a PS2 BIOS Legal?
Worth being clear about this.
The PS2 BIOS is copyrighted software owned by Sony. The only method that is legal everywhere is dumping the BIOS from a PlayStation 2 console you own yourself. The PCSX2 team recommends this approach in their own documentation, and it is the only route with no legal grey area attached.
Downloading a BIOS from a third-party site may breach copyright law depending on where you live, even if you own a console. Laws differ between countries, so the responsibility for staying compliant sits with you.
If you own a PS2, dumping your own BIOS is genuinely straightforward and takes about 20 minutes. Our guide on how to dump a PS2 BIOS from your own console covers the whole process for both modded and unmodded consoles.
FAQs
You’re Ready to Play
That is the whole process. Extract the file, drop it in the right folder, point your emulator at it, and you are done. The vast majority of BIOS problems come down to one of two things — a file still sitting inside a ZIP, or a folder path that is one level off.
Your next steps:
- Not sure which version to run? Read which PS2 BIOS to use
- Own a real console? Learn how to dump your own BIOS
- Still seeing errors? Check our PCSX2 BIOS error fixes
- Need the files? Head to the PS2 BIOS download page